How to restore or roll back a Windows XP system. How to roll back a Windows XP system back a few days System rollback on xp
Windows XP Restore Point it is created very simply, it is also easy to roll back with it, if you want to delete all restore points, to free up more space on your hard drive, you just need to disable system restore. In order to remove all points except the last one, you need to read our article to the end. I promise everything will be simple, clear and interesting.
Windows XP Restore Point
Our regular reader has been asking me for a long time to write an article about how a simple Windows XP system recovery works and what interesting aspects there may be that are unknown to beginners and others. We have a lot of articles about how to restore Windows XP in the most hopeless cases and with various little-known methods, for example, but here are articles about how to create a simple Windows XP restore point and there is no way to roll back with it, which means we are correcting ourselves.
When you work in an operating system, the function and the Windows XP restore point created with its help can be very useful to you. It works on the principle of a time machine and does not take up much computer resources, especially when it comes to modern powerful computers.
Let's look at the application XP restore points on a specific example. Let's say you installed some program or driver package, and then found out that your operating system is not stable, deleting everything you installed will most likely not solve the issue, this is where our restore point comes in handy. Before creating it, let's make sure that System Restore is enabled on our computer. Right-click on the icon My computer and select from the drop-down menu Properties->System Restore.

Please note that disk monitoring is enabled on my computer (C:),

this means that I have System Restore enabled for this disk and so-called restore points or system snapshots are created, and many also call them snapshots of the operating system, that is, everything that is done on your computer is remembered. Is it important when it is remembered?
- An XP restore point is created automatically every 24 hours.
- Before installing many programs and drivers without a digital signature.
- And you yourself, before any serious action, can create a restore point.
So we have System Restore enabled for the drive (C:), by default Windows XP reserves 12% of the disk space for recovery points. In the Settings window, you can use the slider to increase the space on your hard drive for storing recovery points, then even old system snapshots will be stored for a long time and you can roll back to them at any time.

You also need to know that system recovery mainly affects only important system files, but not your data; for example, it will not be possible to return an accidentally deleted file by using a restore point.
If you wish, you can enable monitoring of any other disk in the system. Click on the desired volume with the mouse, then the Options button and uncheck the Disable system recovery option.

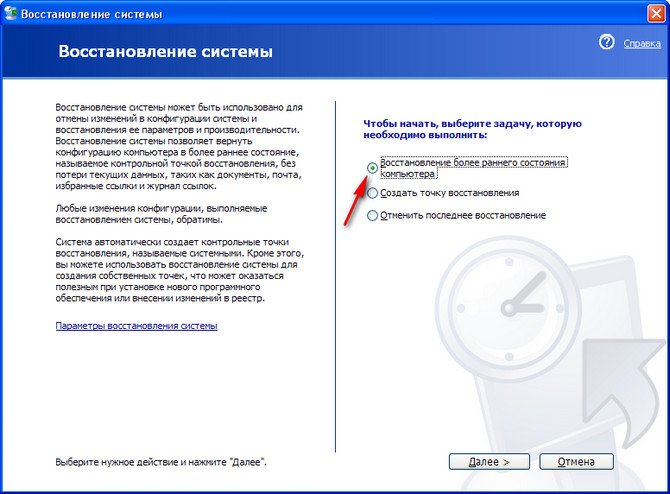
Now let's imagine that we are installing an unfamiliar program on a computer. Naturally, before installation we will create a restore point Start->All Programs->Accessories->System Restore. In this dialog box, you can restore your computer to an earlier state, create a new restore point, or undo the last restore.
Create Windows XP restore point and onwards

The description of the recovery point should contain information about why exactly this point was created, today is the environment, well, let’s call it, for example, the Total Commander program installation environment, then Create and we can safely install our program.


Now imagine the situation that after installing our program, the computer began to behave unstable and we decided to roll back using the restore point we created. We launch system recovery. Start->All Programs->Accessories->System Tools->System Restore. Restoring your computer to an earlier state.
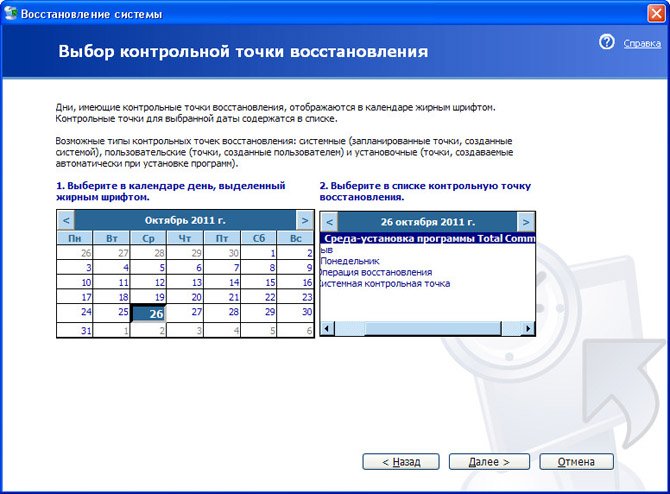
Select our recovery checkpoint.
The procedure is reversible and will not affect our current data. Next, the recovery process will begin with a reboot of the computer, then you can make sure that there are no traces of the program that caused your computer to behave unstable.
Sometimes a situation arises when it is necessary to quickly undo unwanted changes to the system: for example, after updating software, installing drivers or cleaning the registry, problems with stability began Windows. However, not all users know How do a rollback How And When making rollback points yourself, and in what cases the OS makes them in auto mode - in general, I will try to compactly answer all pressing questions on this important topic in this note.

Let's start by checking if the System Restore service is running (process rstrui.exe ). To do this, use the button " Start", right-click on " Computer"→ next, in the drop-down menu select " Properties" → "System protection ". In the "Protection Options" area, the available local drives and their level of protection will be displayed. By default, System Restore is enabled for the drive where Windows (C:\). However, you can enable it for any other drive by checking the desired one (for Vista this is all manipulation!) and pressing the button " Tune" (first screenshot).

In the window that opens, activate " Restore system settings and previous versions of files" and confirm the changes with the " button OK". Besides, in Windows 7 the ability to manage disk space for system recovery has returned, as was the case in XP, but for some reason it was “forgotten” in Vista(screenshot below).

When Windows itself (automatically) creates restore points ?
This happens in the following cases:
- when installing programs and drivers;
- when installing OS updates via the Internet;
- according to schedule (every 24 hours in Windows Vista and every 7 days in the "seven");
- when the system is rolled back to one of the earlier restore points.
Of course, the user can independently create a rollback point before any potentially dangerous actions (such as changing system files) according to the principle " more - no less".
How to perform a system rollback ?
All restore points Windows are located in a hidden system folder C:\System Volume Information. You can independently “roll back” to the desired point in several ways, for example:
- via the button " Start", click " Help and support " → "Undoing changes using System Restore " → "Restoring your computer to an earlier state " And " Further" (For Windows XP);
- through " Start", click " Control Panel " → "System Restore " (or "Recovery") → " Running System Restore " → in the final, select the desired rollback point (screenshot);
- via hotkey combination " + R" → in the box enter rstrui → "OK" (the most convenient option for Windows 8).

A few important notes
- I quote the help article from the Microsoft website: " System Restore does not protect drives with the FAT32 file system and other FAT file systems because such drives do not support shadow copies". IN XP When creating a rollback point, only key system and program files were tracked, unlike Windows Vista / 7 / 8 , where, thanks to Volume Shadow Copy Service Volume Shadow Copy Service or VSS), changes are recorded throughout the section. In any case, personal files are not included in OS restore points, i.e. all your documents and photos will not disappear after the rollback.
- If you encounter any problems with loading and stability of Windows, you should use the latest restore point created shortly before the date and time when the problems began. If the situation has not changed, you can always choose another (earlier) rollback point.
- I recommend that beginner computer scientists read my
Instructions
Open the Start button menu and select “All Programs” -> “Accessories” -> “System Tools” -> “System Restore” there. A dialog box for working with system recovery or for creating new snapshot points will appear on the screen.
To perform such operations, system administrator rights are required. Therefore, if you are running under an account that does not have administrative rights, you will be prompted for Administrator. Before performing system recovery, enter the password in the window that appears and click the “Ok” button.
The Restore Wizard will display a list of all existing restore points. Select the point you need from this list, corresponding to the previous day of work. Click Next again.

In the next wizard window, check that the point is selected correctly and start the system recovery process by clicking on the “Next” button again.


note
You can return the system to a previous state if restore checkpoints were created. Start -> Control Panel -> Performance and Maintenance -> System Restore (on the left in the menu), then select the date for which there is a restore point and follow the instructions that appear.
Helpful advice
Select the desired restore point; if several changes were made to the system on this day, then you can select the desired event (time of change of this day). Click "Next" Confirm your desire to roll back the system to this saved point by clicking the "OK" button. Observe the process of restoring the settings saved by the system.
The image of loading the operating system has become so familiar for most users that they don’t even pay attention to it. All the more shocking may be the sudden appearance instead of incomprehensible text on a black or blue background, full of unknown terms, names and numbers, after which the computer refuses to boot further. But this is exactly what the “fall” of the system looks like, which, unfortunately, can happen from time to time.

Why does this happen, how dangerous is it, and is it possible to restore Windows XP?
There are several reasons why a system crashes, ranging from a power surge that causes confusion to the malicious activity of computer viruses. Sometimes the cause can be identified by remembering your previous actions at the computer. If you installed new programs (unknown or even known to you), and even more so - new devices, then most likely this disrupted the operation of the operating system.
A system crash usually does not pose any great danger. It does not lead to the destruction of data on the disk (of course, if the system crash itself was not the result of data destruction on the disk), but only makes it impossible to access it. Everything remaining on the disk - photos, movies, etc. - can be easily retrieved if the disk is connected to another, working computer. After which the simplest and most reliable, although time-consuming, method is to simply reinstall the operating system and all the necessary programs.
Unfortunately, often the user does not want to resort to this method, because it can take a long time. Well, in this case, it makes sense to try to restore the system using the tools offered by Microsoft.
The easiest way is to try to boot into safe mode. To do this, when loading, after completing the self-test, press F8 and select “Safe” in the menu that appears. If this is successful, then you just need to undo the last actions that led to the crash of the system - installed equipment and programs, run the antivirus - and within a few minutes the system may be operational again. As a last resort, safe mode will allow you to copy the files you need without resorting to outside help, after which the system can be safely reinstalled.
If the situation is more complex and the menu does not load, try restoring the system using the installation tool. To do this, you will need to boot from the Windows disc (pre-enable booting from CD in the BIOS), and the installer will offer the option to begin the recovery. The process is similar to installing the operating system again, but all installed programs and, of course, the data for them will remain intact.
The boot disk also gives you another opportunity - to use the recovery console. True, its use requires some knowledge, but the fixboot command in some cases turns out to be life-saving, restoring the boot sector of the disk. Try also fixmbr and chkdsk - “repairing” the file system and checking the disk for errors can also have a “healing” effect on the system.
If nothing helps, there is a direct route to computer experts, or to reinstalling the system on your own.
Video on the topic
If various problems arise with the computer software, viruses, erroneous deletion of the desired program, or system failures, a system rollback helps. This program is available in Microsoft Windows systems starting with the XP version and allows you to avoid many problems with your computer.

Instructions
If the system is loaded, then restoring it to an earlier one is easy. Click the "start" button, select "programs", then the "standard" folder, the "system" folder and click on the "system restore" shortcut. When asked by Windows what exactly you want to do - create a restore point or system, select " restore to an earlier state". After this, you will be asked to choose the exact moment in which you want to restore. You should not choose very old restore points - they can be made by programs you need, which will not work after such a rollback. Choose the closest restore point, but always the one at the time of creation of which you did not have the problems that you want to roll back.
The menu item “load last”, which opens in the list when you press F8, is also a rollback. This item will restore the system to the nearest restore point created during the last successful boot. Such a procedure may occur if, as a result of installing any driver, device, or other actions, the system is neither in normal nor in safe mode.
Helpful advice
Keep an eye on System Restore! Let it be turned on all the time - this will help avoid serious problems with Windows problems.
Be sure to create restore points before installing programs and drivers!
Sources:
- how to perform a system rollback
Thanks to the ability to go back in time in the Windows system through restore points, the operating system can be restored to an earlier date. Windows creates restore points automatically when installing programs that the system itself believes can make changes to its architecture or cause harm in some way.

Instructions
In order to perform an early rollback, you need to select a restore point in the past. To do this, on Windows 7 / Vista, go to the “Control Panel” in the “Start” menu, select the view mode - large icons or small icons, and find the shortcut that is “Recovery”.
In Windows XP, the system recovery utility is in the “Start” menu - “Programs” - “Accessories” - “System Tools” - “System Restore”.
In the System Restore window, click the “Run System Restore” button. In the recovery wizard window that appears, click the “Next” button and select a recovery point that is as distant as possible from today’s date, then click “Next” and “Finish”.
The computer will restart, but if it doesn't, you will need to. Also, before or after the reboot, you will see a recovery process bar on the screen. Windows will start normally when the recovery process reaches the end, in other words, when the strip loads.
Sources:
- how to roll back windows xp system
Updates operating system is a good opportunity to improve installed programs for free, increase the security of your computer and the stability of its operation. The developers of the most widespread operating system in the world assure us of this. However, allowing a computer to communicate with servers is not always appropriate.

Instructions
If you are using the XP version, select "Automatic" from the available settings options. By double-clicking on it with the mouse pointer, you will see a new window with update settings. In it you need to choose from four positions:
Automatically (by selected and time);
Download updates automatically, but let the user choose the installation time;
Notify but do not download and automatically;
Disable.
To cancel updates, select the last option and click OK. The system will no longer automatically receive updates until you change these settings again.
Once in the Control Panel in Windows Vista and later, select Windows Update. In the window that opens, on the left you will see the available commands for this wizard. Select "Settings". A new window will appear in front of you, in which you can select the update mode from the drop-down list (similar to the Windows XP menu in step 2). You can also, or, conversely, cancel the ability to receive optional but recommended system updates. To disable updates, select “Don’t check for updates” from the drop-down list and confirm your choice by clicking “OK.”
You will be returned to the main Update Center window. On the right side you will see the “Check for updates” button. Even if the update is disabled, by clicking on it, you can receive and view a list of released mandatory and recommended operating system updates and, if desired, choose which ones to install.
When the computer starts to not work as expected - it glitches, freezes, slows down, it is necessary to take at least some measures. The first action for many in this case is to restore the system, or “ rollback».

You will need
- A system restore point created in advance (manually or automatically);
- Computer administrator rights.
Instructions
And finally, for the most rollback and you need to click on “Recovery” in the “System Protection” tab. Click “Next” (will only be done if there is at least one point). In the list that opens, select the control point we need, “Next”. Recovery has begun. After reboot it will report the result rollback A.

Video on the topic
note
The instructions were written for Windows 7 (since the author did not have XP).
Helpful advice
Create system restore points as often as possible so that if you need to rollback, you have more options.
In some cases, user actions lead to very undesirable consequences in the operation of the operating room systems and programs. For example, an important system file may be deleted by mistake, or Windows may begin to “glitch” as a result of incompatibility of programs or drivers. Inexperienced users immediately begin to reinstall the operating system, which is completely wrong.

You will need
- Operating system: windows xp, windows vista, windows 7
Instructions
First, think carefully about why the operating room malfunction began? If after installing a new program, then uninstall it; if after installing, then uninstall and download a new one from the manufacturer’s website. If your actions do not bring what you want, then in this case you need to do systems.
Video on the topic
Rollback systems is carried out with the aim of restoring it after changes that resulted in loss of its performance. When rolling back systems System files and registry programs are subject to change. The user's personal files remain unaffected.

Instructions
Having detected changes that partially or completely affect the operating systems do not rush to start the service to restore it. To begin, if possible, save all changes to open files and close all running programs. It is also recommended to close programs running in the background. Recovery Service systems During its operation, it will reboot the computer.
Start recovery systems you can by clicking the "Start" menu and selecting "All Programs" - "Accessories" - "System Tools" - "Recovery" systems". The "Recovery" service window will open. systems". In this window, you will need to select a recovery point to which you will need to perform. By default, the program will offer to select the last control point, but it is better to select it manually. Select a recovery point that was created shortly before problems with the system began.
Wait for the recovery service systems will do its job. This may take a few minutes. During recovery systems The computer will definitely reboot. Do not turn off the computer's power while it is rebooting. After it, the computer will start in normal mode and immediately after the start a dialog box will appear on the screen asking whether the recovery operation will solve the existing problems. If everything is in order - click OK, if not - recovery operation systems can be cancelled.
Video on the topic
note
System restore points are created every day, as well as before each significant event (installation of a program or driver). You can also create restore points manually.
If System Restore is disabled on your computer, restore points will not be created. Be sure to enable the rollback function in order to return the system to a working state at any time.
No one is immune from various emergencies, wrong decisions and erroneous actions. And if in life you most often have to wait for consequences, then in the world of computers everything is simpler - you can turn back time and correct a mistake.

Instructions
There are several options for undoing erroneous actions. Specific instructions depend on the area in which the error occurred. All in all, changes can be roughly divided into system and software. To system changes m can include: deleting a folder or file, renaming a file, moving an object, installing or removing programs, changing system and personal settings. To software - changes, which are made inside programs, for example, deleting part of the text from a document, changing settings inside the program.
A universal tool for making changes, both system and software, is the keyboard shortcut “Ctrl+Z”. Pressing these keys can undo most actions that the user performs by mistake. At the same time, the combination works both in the operating system and inside most programs. Random movement, renaming, deleting text, unwanted changes in graphic and other editors they are canceled by the keyboard shortcut “Ctrl+Z”. However changes system settings, installation or removal of drivers and programs cannot be rolled back in this way.
In order to recover deleted files, you should first look in the Recycle Bin. Its shortcut is always located on the computer desktop. If the Recycle Bin is not disabled, you can easily recover a deleted file. You should select it from the list, click once on it, and then click “Restore”. If the Recycle Bin is disabled, you should use special data recovery applications. Using them, you can even recover files after accidentally formatting your hard drive.
If problems with your computer began after installing a program or driver, they should be removed. The program can be uninstalled by clicking “Add or Remove Programs” in the “My Computer” window. In the list that opens, you need to find the program and click the “Delete” button. Driver rollback occurs as follows. Right-click on the “My Computer” shortcut. On the Hardware tab, select Device Manager. In the window that opens, select from the list the device for which the driver was updated. Right-click on it and select “Properties”. On the Driver tab, select Roll Back Driver. If necessary, restart your computer.
There are also cases when, due to inexperience, the user changes the system settings and it crashes. At such a moment, you can resort to system recovery. This option works by default on Windows. Go to: “All Programs” - “Accessories” - “System Tools” - “System Restore”. Select "System Restore". Next, follow the prompts of the recovery wizard. Select a restore point and click Restore. After this, the computer should reboot. After rebooting, wait a while for the recovery process to complete. Upon completion of the operation, the system will tell you about a successful rollback to the moment you selected. In this way, you can reverse the serious consequences of incorrect settings or incorrect operation of some programs that caused a system failure.
Video on the topic
note
Do not install programs or drivers unless you are sure they are compatible with your system.
Do not make changes to the system registry unless you are confident in your knowledge.
Helpful advice
To avoid problems with recovery, make backup copies of your files before making changes.
There are several proven techniques that allow you to quickly restore the working condition of the operating room. systems in case of infection with a virus or failure of some functions.

You will need
- - DVD disc.
Instructions
To use the operating system restore feature systems Windows Seven, you must enable automatic creation of recovery checkpoints. In some situations, you can create these records yourself. Open the My Computer menu properties.
Go to "Protection" systems", located in the left column. In the tab of the same name, find the “Protection Settings” menu. If “Disabled” is configured next to the system disk partition, click the “Configure” button.
Select "Restore settings" systems and previous versions of files." Review the contents of the “Disk Space Usage” menu. Set the hard drive size used to create recovery checkpoints systems. It is recommended to allocate more than 1.5 GB of hard disk for this purpose.
To restore the required state at the right time systems, create her image. Open the Control Panel menu. Go to the System and Security menu. Open the "Backup and Restore" submenu. Go to "Create an image" systems».
Select a location to store this image. Ideally, this should be a portable USB drive, but you can use one of the partitions on your installed hard drive. Click "Next". In the next window, click the “Archive” button and wait until the image is created and recorded systems.
To be able to start the recovery process in cases where you are unable to boot the operating system, create a recovery disk systems. To do this, open a similar item in the “Backup and Restore” menu.
Insert a blank DVD into the drive, select this disc reader, and click the Create Disc button.
In case of refusal systems, insert this disc into the drive and start it. Select "Recovery" systems" Specify the image of the operating room systems or a checkpoint to restore it.
There are several methods for fixing the Windows XP operating system. This usually requires an installation disk or LiveCD, but sometimes you can do without any utilities.

You will need
- - Windows XP installation disk.
Instructions
If the computer is loading the operating system, try using standard methods to restore it to working condition. Restart your computer and press F8 after the hard drive starts booting. A menu will appear containing several options for continuing to start the OS.
Select Last Known Good Configuration. After its activation, changes that may have affected the performance of the system will be canceled. If this method failed to restore the working state of Windows XP, then restart the computer again and open the menu described above.
Select "Safe Mode". If the computer successfully starts the operating system in safe mode, then perform the recovery process. Open the Start menu and expand the All Programs menu. Now open the Utilities submenu located in the Accessories menu. Select "System Restore".
Now select a control point based on the date it was created. Click the "Restore" button and wait for this process to complete. Restart your computer and start the Windows XP operating system in normal mode.
If the reason for the inability to start the OS is a failed boot sector, then restart the computer after inserting the Windows XP installation disk into the drive. Wait for the first menu containing three items to appear. Press R to go to the System Recovery Console.
After a while, a menu will open asking you to select a system to boot. If only Windows XP is installed on this hard drive, then press the number 1 and the Enter key. On the next line, type fixboot and press Enter. Now press the Y and Enter keys. Restart your computer when the message “The new boot sector was successfully written” appears.
Video on the topic
Service Pack 3 is the third version of the service pack for Windows operating systems. It can either be contained in the installation files of the distribution, or installed by a separate program, while its removal is possible only in the second case using the system recovery utility.

You will need
- - skills of a confident PC user.
Instructions
Open the list of programs using the Start menu. Select “Utilities” in the standard programs section and run the Windows operating system recovery utility.
In the window that appears, use the arrows to select the checkpoint date that was created before you installed Service Pack 3. Please note that this will remove all programs you installed for the period from the restore point to the current moment. The operating system settings will also change.
To avoid data loss, save user program files that can be uninstalled during a system rollback. These could be various logins and passwords, configuration settings, progress save files, and so on.
In the window that appears, read the other conditions for rolling back the operating system to its previous state. First shut down all currently running programs. Perform a system restore. In this case, the computer will automatically reboot, removing Service Pack 3 along with the installed programs. This option is only relevant if SP3 was installed on your computer as an update. If the version of your operating system originally contained it, use the installation of the distribution kit with SP2 or any other version you need.
To reinstall the operating system, insert the disk with Windows XP SP2 or any other version into the drive and restart the computer. As soon as it turns on, press Esc and in the menu that appears, set your disk drive as the initial system boot hardware. Save the change and continue booting from the CD by pressing any key. In the Windows installation menu that appears, complete the installation, following the system instructions exactly.
Video on the topic
note
Be careful when removing the operating system from the disk; save all important data as it will be deleted.
Helpful advice
Create operating system restore points frequently.
Necessity updates files in the operating room is associated with increasing its safety and stability. However, there are often situations when, after installing another updates certain problems arise. In this situation, the user begins to think about how to remove installed updates.

Instructions
Don't forget before you start updates create a restore checkpoint. This will help, in case of any problems, to return the system to its previous state. To create a restore point, open: “Start” - “All Programs” - “Accessories” - “System Tools” - “System Restore”. Select “Create a restore point”, click “Next”. In the window that opens, specify the name of the point to be created - for example, the date of creation.
If after updates the system is not working correctly, try removing it updates. Open: “Start” - “Control Panel” - “Add or Remove Programs”. At the top of the screen, find the “Show updates" and check the box next to it. After this you can remove installed updates. If for some reason this failed or the rollback did not lead to the desired changes, try to restore the system to an earlier state through previously created checkpoints.
It's possible that you didn't create any checkpoints. Try to find them anyway, since the system itself creates such points when installing programs, drivers, etc. In the recovery window, days for which checkpoints were created are highlighted in bold. Select this item and carry out the recovery procedure.
Unfortunately, in many cases the recovery procedure does not help. If you have an installation disk, reboot and start the system from it in recovery mode. In this case, all modified files will be replaced with their originals from the CD. Your data will not be affected.
There is another recovery option - reinstalling the operating system in updates. Boot the computer, insert the OS disc into the drive. Select Windows installation in the menu that opens, then - this is important! – when a new window appears, select the “Update” option. In this case, all your settings, programs and documents will be saved.
Considering that some kind of failure is always possible, before updating, save important data to external media or to another drive - that is, not to the one on which you are installing the OS. If you have one disk, split it into at least two. One will host the OS, the second will store all the data. This option significantly increases the safety of information - even if the OS completely crashes, your files on the second disk will not be damaged.
Sources:
- how to remove windows xp updates
Sooner or later, any user is faced with the problem of unstable operation of the Windows XP operating system. Often in such situations, many people reinstall the OS. But instead, you can simply restore it to normal work.

You will need
- - boot disk with the Windows XP operating system.
Instructions
One of the main ways to restore the operating system is to use the so-called recovery console. To work, you will need a boot disk with the Windows XP operating system. Insert the disc into your computer's optical drive. Restart your PC.
Immediately after the reboot, as soon as the computer starts to start, press F8. Basically, it is with this key that you can open the BOOT menu. If you were unable to access the BOOT menu using F8, try other F keys.
Next, in BOOT, select your optical drive and press Enter. Wait a few seconds for the disk to spin up and press any key. After this, the files will begin downloading. Upon completion, the “Install Windows XP” dialog box will appear. Press R.
The Recovery Console will open. You need to select the directory of the operating system that will be restored. By default this is the C:WINDOWS directory. Select it and press Enter. A notification appears asking you to enter the administrator password. If you did not set a password, then simply press Enter.
Then type Fixboot followed by the Enter key. A notification will appear that the boot sector is being overwritten, press the Y key and wait for the process to complete. A message appears indicating that a new boot sector has been written.
Now enter the Fixmbr command and confirmation. Then press the Y key. You will see a notification that a new boot entry has been created.
After that, enter the Exit command. The computer will restart. The next time the PC is turned on, it will occur in normal mode. This completes the recovery procedure. In most cases, using this method it is possible to completely restore normal operation of the Windows XP operating system.
Sources:
- how to restore windows
Sometimes there are times when a program stops working correctly. You can, of course, simply reinstall it, but this will reset all settings. Also, this option will not work if there is no application distribution kit. But there is a way that is much simpler and more convenient, namely: rollback programs, allowing you to return it to an earlier state.

You will need
- - a computer with Windows OS.
Instructions
Any Windows operating system, from Millennium to Windows 7, has an option to restore the system to an earlier state. This process restores not only the operating system, but also the programs that were installed on the hard drive at that time.
Click Start. Select All Programs. Next, left-click sequentially “Accessories” - “System Tools” - “System Restore”. In the window that opens, click on the item “Restore your computer to an earlier state.”
A window will appear in which all restore points will be available. Each point will correspond to a specific date. Select the desired date for rolling back the program state. After selecting a restore point, click Finish.
The computer will reboot and the system recovery procedure will begin. Usually this doesn't take much time. During the recovery process, no other actions can be performed on the computer. You can monitor the process using a strip. As soon as the bar reaches the end of the screen, your computer will reboot and start in normal mode.
After the operating system has fully loaded, you will see the message “System Restore completed successfully.” Now you can check the program's operation. If the system restore did not meet your expectations, and the program rollback did not go as expected, try choosing a different restore point.
It is possible that after the recovery process, shortcuts for quickly launching the program will disappear from the desktop. In this case, you should go to the folder in which the application you need is installed and find the executable file there; it has the exe extension. After that, double-left-click on this file and the program will launch.
Video on the topic
To restore the Windows operating system, I often use the method of returning to a previous state. To successfully use this feature, certain conditions must be met.

You will need
- Windows boot disk.
Instructions
Rollback to a previous state is performed using recovery checkpoints or an operating system image. If you haven't disabled automatic archive creation, try using them. To begin, insert a Windows boot disk into the drive.
The Windows XP operating system two years ago was the most popular OS in the world - it combined ease of use, reliability and was perfect for solving most tasks performed on a PC.
Although Microsoft has discontinued technical support for XP, a fifth of all computers still run it. One of the reasons for this popularity is the ability to roll back the Windows XP system to a working state in case of any problems.
Quick navigation through the article
Checking System Restore Service
Windows XP has a built-in ability to restore the system in case of failure and incorrect operation. The mechanism itself is quite simple - “snapshots” of the configuration and settings of important system parameters are created and placed as “recovery point” files in a specific folder on the hard drive.
This method, unlike a complete reinstallation of the system, usually does not affect the safety of the user’s files and data (depending on the settings of the “restore point” when creating it). To check if the recovery system is active, you must:
- Click “Start”;
- Right-click on “My Computer” and go to “Properties” -> “System Restore”.
Creating a restore point
Although Windows itself creates restore points (this happens when installing new programs and drivers, installing updates, and according to a set schedule), it is best to create them yourself periodically. This is done as follows:
- First you need to go to: “Start” -> “All Programs” -> “Accessories” -> “System Restore”;
- Then select “Create a restore point”;
- Give a name to the recovery point and click “Create”.
System Restore
If the restore point was created during a period of stable Windows operation, you don’t have to worry too much in the event of system failures. To restore system functionality you will need:
- Go to: “Start” -> “All Programs” -> “Accessories” -> “System Tools” -> “System Restore”;
- Select “Restore the computer to an earlier state” -> “Next”;
Please note that all installed programs and settings made after the date of the restore point will be lost (the same applies to files, depending on the settings specified at the time the restore point was created).
Safe mode
If your computer fails to boot normally as a result of a crash, but you have previously created a Windows restore point, you can restore from safemode. This is done as follows:
- You need to restart your computer (or turn it on);
- Press the “F8” button when loading;
- In the window that appears with additional boot options, use the arrows to select “Safe Mode” and press “Enter”;
- Wait until the computer boots in “safe mode”;
- Go to: “Start” -> “All Programs” -> “Accessories” -> “System Tools” -> “System Restore”;
- Select “Restore the computer to an earlier state” -> “Next”;
- In the left window, select the date of the desired control point;
- Click “Next” and “Next” again (to confirm);
- Wait until the system restarts.
Theoretically, any updates are designed to optimize the operation of the system and certain programs. However, in practice it happens that everything does not go as the user wanted, and the system fails. This can also happen when installing new software. What to do in such a situation? Some users believe that the solution is to reinstall the operating system. In fact, everything is much simpler, especially if you know how to roll back a Windows XP system to a day ago or any other period when the OS was working normally.
What will you need?
Some users believe that third-party utilities are needed to return to the rollback point. This is partly true. But the system also has built-in tools that will help us restore a successful configuration.
The first thing you need is a restore point. By default in Windows these points are made automatically. Typically, such an operation occurs before any significant events affecting the system, for example, before cleaning the registry or installing new applications, etc. Actually, this procedure in terms of complexity is almost the same as checking the authenticity of Windows 7 online, so there is a point for a rollback you can create it yourself.
Rollback Windows XP
In order to return the system to a previous state, you must first log in with an administrator account. Next, click Start and follow the All programs link. Here we are interested in standard and utility utilities. In them, click on the System Restore command. Check Restore previous state and confirm by clicking Next. After that, in the window that opens, you need to select a restore point. The last stage is to confirm your choice and start the process.
After the operation is completed, the computer will reboot. Actually, in the future there should be no problems with the operation of the system. However, if the computer does not start, you may need to cancel the OS restore.
Please note that files that were saved on your computer after the selected date will be deleted. Therefore, if necessary, make sure to have a backup copy of them. Some users prefer to use third-party utilities to roll back the system to the desired state. In principle, this is also a good solution, but it is not recommended for beginners to use the programs, since they are not as easy to use as they seem.
 Choosing a tablet or what you need to pay special attention to before buying a tablet Additional useful options that you should pay attention to
 Easily monitor SQL Server activity
 Several useful programs